
How to Thread a Sewing Machine (Without Feeling Overwhelmed)
Threading a sewing machine can feel like one of those things everyone else already knows how to do.
You open the manual, look at the diagrams, and suddenly you're trying to figure out what a take-up lever is, why the thread needs to zigzag across the machine, and whether you've already missed an important step.
If that sounds familiar, you're in good company.
The truth is, threading a sewing machine isn't difficult. It's simply a sequence. Once you understand why the thread follows a particular path, the process becomes much easier to remember.
Around here, we believe sewing isn't random. And neither is threading your machine.
Let's make it make sense.
Quick Answer
To thread a sewing machine, place your thread on the spool pin, guide it through the machine's thread guides, seat it correctly in the tension discs, thread the take-up lever, and finally thread the needle. Always thread your machine with the presser foot raised so the thread can seat properly in the tension system.
In This Guide
Why the Thread Path Matters
How to Thread Your Sewing Machine
Common Threading Mistakes
Frequently Asked Questions
Why the Thread Path Matters
Before we jump into the steps, it helps to understand what your sewing machine is actually doing.
Every stitch is created by two threads working together. The upper thread travels down through the needle. The bobbin thread travels up from underneath.
Those two threads meet in the middle of the fabric and lock together to create a stitch.
For that to happen consistently, the upper thread needs to follow the correct path through the machine. Each guide, lever, and tension disc has a job to do.
When the thread misses one of those steps, the machine still tries to sew—but the stitches usually tell you something isn't quite right. That's why understanding the mechanics matters just as much as memorising the sequence.
Sewing machines don't create problems at random. They respond to the way they're threaded.
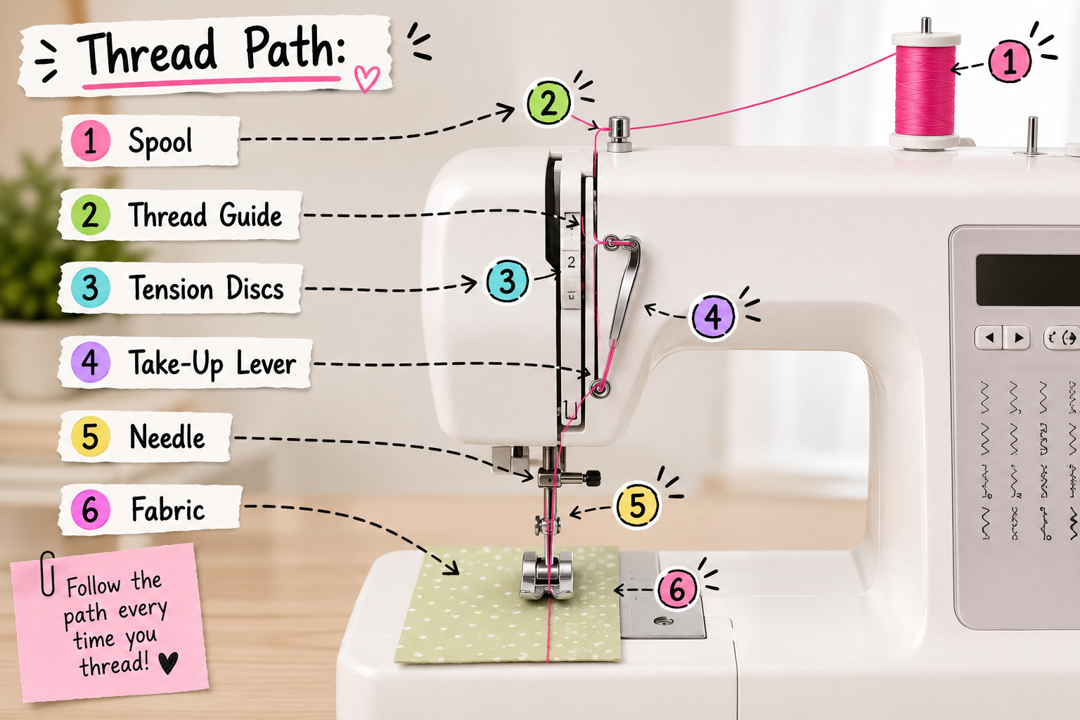
This is one example, each machine has it’s own path, but fundamentally they all have a sequence similar to this.
Before You Start
Take a moment to prepare your machine before threading.
Make sure:
Your machine is turned off.
The presser foot is raised.
The needle is in its highest position.
Your spool of thread is on the spool pin.
Your bobbin has already been wound and inserted.
If you haven't wound your bobbin yet, start there first and then come back to this guide. Taking a few extra seconds now often prevents several minutes of troubleshooting later.
Step 1: Place the Thread on the Spool Pin
Place your spool of thread onto the spool pin. This is where the thread begins its journey through the machine.
Make sure the spool sits securely and that the thread unwinds smoothly. If the thread catches or wraps around the spool unexpectedly, it can affect tension later in the sewing process.
It may seem like a small detail, but small details often become bigger sewing problems.
Step 2: Follow the Thread Guides
Next, pull the thread through the first thread guide at the top of your machine. The thread guides have one important job: they keep the thread travelling along the correct path.
Think of them as road signs. Without them, the thread can wander where it shouldn't, leading to uneven tension or skipped stitches.
Most sewing machines include a threading diagram printed directly on the machine. Follow that guide slowly rather than trying to memorise the path. Understanding is always more helpful than rushing.
Step 3: Seat the Thread in the Tension Discs
This is one of the most important steps in the entire process. The tension discs control how much resistance is applied to the upper thread as the stitch forms.
If the thread isn't seated properly between these discs, the machine can't maintain balanced tension.
That's when you might notice:
thread bunching underneath the fabric
loose loops
uneven stitches
thread nests
This is also why it's important to thread your machine with the presser foot raised. When the presser foot is up, the tension discs open so the thread can slide into place.
When it's down, the discs are closed, making it much harder for the thread to seat correctly. It seems like a tiny detail. It solves a surprising number of sewing problems.
Sew What Tip
If your machine suddenly starts creating loops or thread nests after threading, don't immediately adjust the tension dial. Rethread the machine from the beginning with the presser foot raised. This simple reset solves more beginner sewing problems than you might expect.
Step 4: Thread the Take-Up Lever
After the tension discs, the thread travels through the take-up lever. This small moving part helps control the movement of the upper thread while stitches are forming.
It's easy to overlook because it doesn't look particularly important.
It is. If the thread skips the take-up lever, your machine won't be able to create balanced stitches consistently. Once you understand its purpose, it feels much less mysterious.
Step 5: Thread the Needle
Now it's time to thread the needle. If you're finding this step frustrating, you're not alone.
A few simple tricks can make it easier:
Trim the end of your thread with sharp scissors.
Hold the thread close to the eye of the needle.
Improve your lighting.
Use a needle threader if your machine includes one.
Using a needle threader isn't cheating. It's simply using the right tool for the job.
Once the thread passes through the eye of the needle, pull several inches of thread toward the back of the machine. Now you're ready to sew.
Step 6: Sew a Test Stitch
Before starting your project, sew a few stitches on a scrap piece of fabric.
This simple habit gives you a chance to check that everything is working properly before you begin.
Look for:
even stitches
balanced tension
smooth fabric feeding
Don't think of this as a test you need to pass. Think of it as collecting information.
Version one is data. If something doesn't look quite right, it's much easier to troubleshoot on a scrap than on your finished project.
Common Threading Mistakes
Even experienced sewists occasionally miss a step while threading their machine.
If your stitches suddenly look unusual, check these first:
Was the machine threaded with the presser foot down?
Did the thread miss one of the thread guides?
Did the thread skip the take-up lever?
Is the thread seated correctly in the tension discs?
Is the needle threaded correctly?
Many sewing problems can be solved simply by rethreading the machine carefully from the beginning.
Not because you're starting over. Because you're debugging. We don't guess. We debug.
Why This Gets Easier
The first time you thread a sewing machine, it can feel like there are far too many steps. The fifth time, you'll probably need to glance at the diagram once or twice.
By the tenth time, your hands will begin remembering the sequence before your brain has time to think about it. That's how learning works.
Confidence doesn't appear before you begin. It grows because you begin.
Every time you thread your machine, you're becoming a little more familiar with the system. And once you understand the system, sewing feels much calmer.
What You Should Do Next
Threading your sewing machine is one of the first building blocks of sewing confidence.
Once you understand the thread path, you'll find it much easier to troubleshoot common problems like thread bunching, uneven stitches, or tension issues.
If you're looking for a calm, step-by-step guide to everything beginners need to know, download the Beginner Sewing Roadmap.
Inside you'll learn:
the sewing tools that actually matter
how to set up your sewing space
sewing machine basics
your first stitches
beginner-friendly fabric guidance
simple checklists to keep you moving forward
Because sewing doesn't have to feel overwhelming. It just needs to make sense.
Frequently Asked Questions
-
Always thread your sewing machine with the presser foot raised. Raising the presser foot opens the tension discs so the thread can seat correctly. Threading with the presser foot down can lead to tension problems and thread bunching.
-
Skipped stitches are often caused by incorrect threading or a damaged needle. Check that the thread follows the correct path, the take-up lever is threaded, and the needle is inserted correctly.
-
Yes. If you think you've missed a guide or threaded something incorrectly, it's usually quicker and more reliable to remove the thread and start again than to guess where the mistake happened.
-
Sew a test stitch on scrap fabric. If your stitches are even and balanced on both sides of the fabric, your machine is likely threaded correctly.