You bought the pattern.
You bought the fabric.
You open the instructions and suddenly sewing feels less like a relaxing hobby and more like you've been handed the assembly instructions for a small aircraft.
Cut 2. Place on fold. Right sides together. Grainline. Notches. Seam allowance.
Excuse me? If you're new to sewing, patterns can feel like they're written in their own language. They kind of are.
But here's the good news: you don't need to memorize every sewing symbol and term before you can use a pattern. You just need to understand what the pattern is trying to tell you.
And once you understand the why behind a few of the most common instructions, that mysterious sheet of paper starts making a lot more sense.
Around here, we don't guess. We debug. So let's debug the pattern.
First: What Is a Sewing Pattern Actually Telling You?
At its simplest, a sewing pattern is a set of instructions for turning flat pieces of fabric into something else.
A shirt.
A bag.
A pair of pajama pants.
A stuffed dinosaur that looked considerably easier on the pattern envelope.
Whatever you're making, the individual pattern pieces give you information about how to cut your fabric and eventually put those pieces back together.
Most pattern pieces will tell you some combination of:
The name of the piece — front, back, sleeve, pocket, waistband, etc.
How many to cut — you might see something like "Cut 2."
Whether the piece goes on the fold
Which direction the piece should sit on your fabric
Where it connects to other pieces
Where your seam will eventually be sewn
You don't have to understand the entire pattern at once. Look at one piece.
Then ask:
What is this piece telling me to do?
That's much easier than trying to decode the entire instruction booklet in one sitting.
What Does "Place on Fold" Mean?
If a pattern piece says PLACE ON FOLD, one edge of that pattern piece should sit directly along the folded edge of your fabric.
And here's the important part: You don't cut that folded edge.
When you unfold the fabric afterward, you have one larger symmetrical piece instead of two separate pieces. You'll commonly see this with things like bodices, skirts and other pieces that need to be symmetrical.
If you've ever accidentally cut along the fold anyway...Well. Now you have two pieces. Ask me how sewing teaches us things. 😏
What Are Notches?
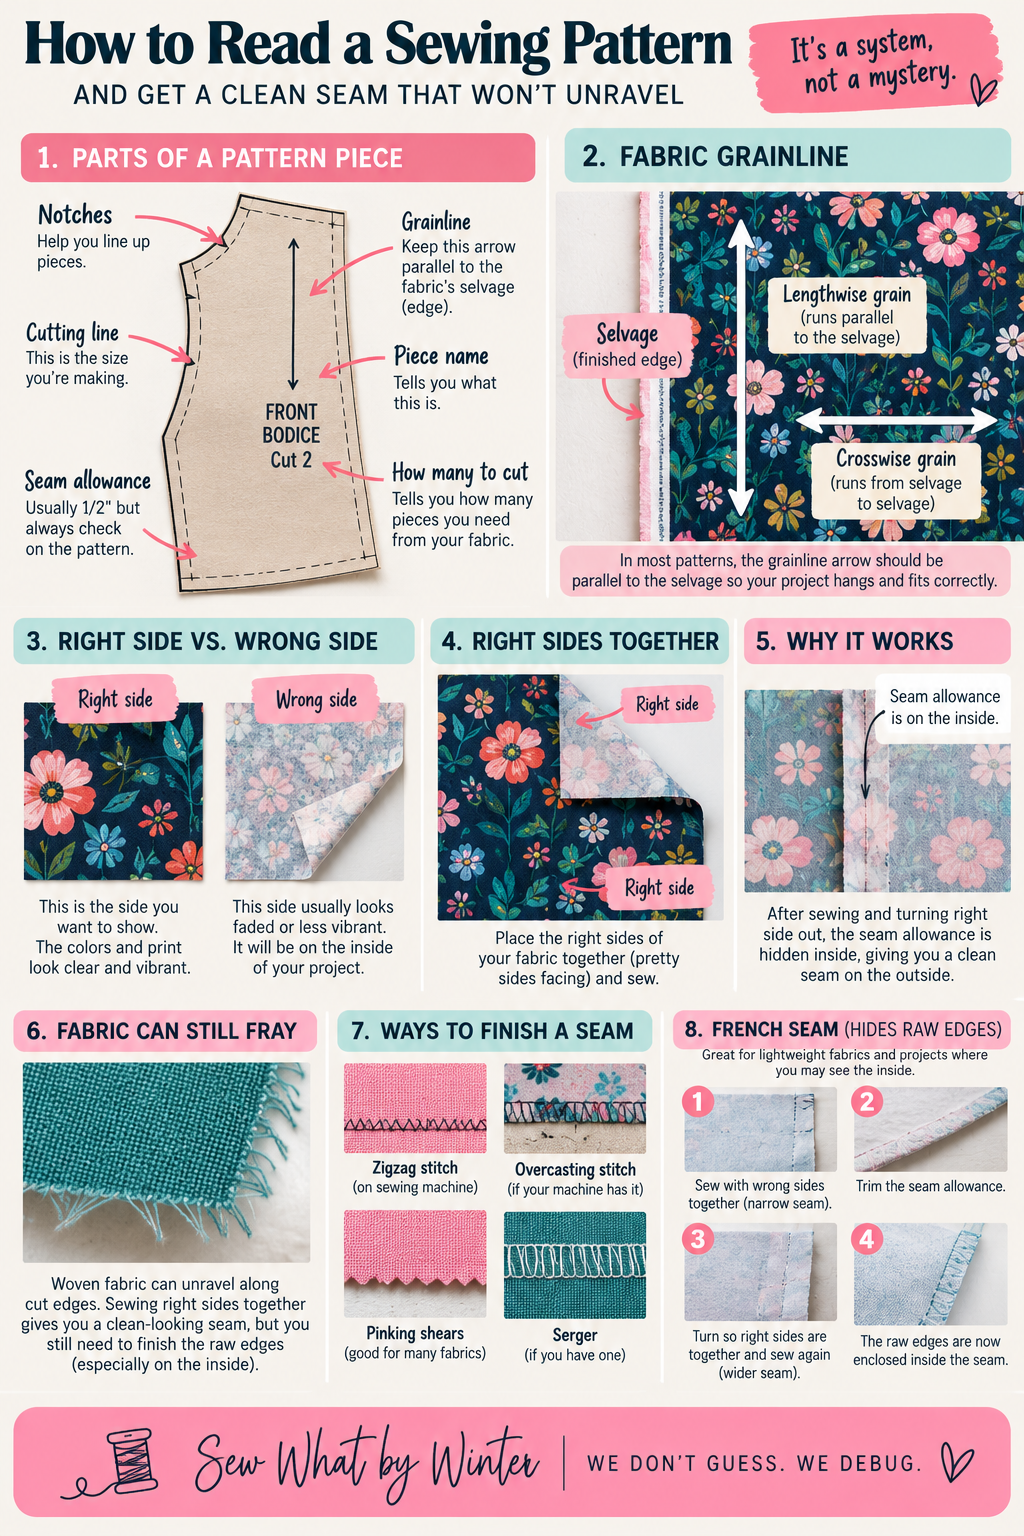
Those little triangles or marks along the edge of a pattern piece aren't decoration. They're notches. Notches help you figure out which parts of different fabric pieces are supposed to meet.
When you're staring at two oddly shaped pieces of fabric wondering how on earth they're supposed to become a sleeve, those little marks suddenly become very useful.
Think of them as alignment markers. Match the corresponding notches, and the pattern is giving you a clue that you're putting the pieces together correctly.
Let's Talk About Grainline
This is one of those sewing terms that sounds much more complicated than it actually is. Woven fabric is made from threads running in different directions.
The lengthwise grain runs parallel to the selvage—the finished edges running along the length of your fabric. The crosswise grain runs from selvage to selvage.
Most pattern pieces have a long arrow printed somewhere on them. That's the grainline. In most cases, that arrow should sit parallel to the selvage of your fabric.
Why does that matter?
Because fabric doesn't behave exactly the same in every direction. Depending on how you pull it, you may notice a little more give in one direction than another. And if you pull diagonally across woven fabric—the bias—you'll usually notice even more stretch.
That means you can cut the exact right pattern piece but still end up with something that hangs, twists or stretches strangely if you cut it dramatically off grain.
So the grainline isn't just another arbitrary sewing rule someone invented to make your life difficult. It's helping control how the finished piece behaves.
Right Side vs. Wrong Side of Fabric
Now we get to an instruction you'll see approximately 47,000 times while learning to sew: Place fabric right sides together.
First, we need to know what the "right side" is. The right side is the side of the fabric you want showing when your project is finished. With printed cotton, it's usually pretty obvious. One side has bright, crisp colors and the other looks faded. The bright side is generally the right side.
The wrong side is the side that will normally face the inside of your project. Some fabrics make this very obvious. Others apparently enjoy watching us struggle. With certain solids, linens and other fabrics, the two sides can look almost identical.
If that's the case, pick the side you prefer and stay consistent. You can even put a small piece of painter's tape or make a removable mark on the wrong side while you're working.
Need to see it instead of just reading about it?
Here's a quick visual you can save for the next time a pattern starts speaking a different language.
So Why Do We Put the Pretty Sides Together?
This is one of those sewing instructions that feels backward until you understand what happens next.
Imagine two pieces of fabric stacked like this:
Wrong side
RIGHT SIDE
RIGHT SIDE
Wrong side
The pretty sides are facing each other. Now you sew along the edge.
When you open those pieces back up, the seam allowance is on the inside and the pretty right sides are showing on the outside.
Ahhhh. There's the reason. We're not putting right sides together because sewing has a weird obsession with hiding the pretty fabric.
We're doing it because it puts the seam allowance where we want it when the project is finished. Once you understand that, "right sides together" becomes a lot easier to remember.
What Is Seam Allowance?
The seam allowance is the distance between your stitching line and the raw edge of the fabric.
Your pattern should tell you what seam allowance to use. You'll often see something like ⅝ inch or ½ inch, but don't assume.
Check your pattern.
That measurement matters because the pattern was designed with it included. If the instructions call for a ⅝-inch seam allowance and you sew at ¼ inch instead, you've changed the finished size of your project.
This is another reason I want beginners to understand what's happening instead of just following instructions blindly. The seam allowance isn't a random number. It's part of the math that turns those flat pieces into the finished size and shape.
But Does Sewing Right Sides Together Stop Fabric From Unraveling?
Not necessarily. And this is an important distinction. Sewing right sides together gives you a clean seam on the outside of your project.
But if you're using woven fabric, those raw cut edges inside can still fray. Take a piece of woven cotton and rub the cut edge between your fingers.
You'll probably start seeing little threads work themselves loose. That's normal.
So sometimes we need to do one more thing: Finish the raw edge.
How Do You Keep a Seam From Fraying?
There are several options, and you absolutely do not need to own every sewing gadget known to humanity. Your regular sewing machine can do a lot.
Depending on your fabric and project, you might:
Sew a zigzag stitch along the raw edge
Use an overcasting stitch if your machine has one
Trim the edge with pinking shears
Finish it with a serger
Completely enclose the raw edge with something like a French seam
Different methods work better for different fabrics and projects. But the important thing to understand is the job they're doing.
Your regular seam joins the fabric pieces together. Your seam finish controls the raw edges. Two different jobs.
Want the Raw Edge Completely Hidden? Meet the French Seam.
French seams are one of my favorite examples of why understanding sewing mechanics is better than memorizing rules.
Because remember how I just told you: Right sides together?
Well...
For a French seam, you're going to start with the wrong sides together. I know.
Sewing likes to keep us humble. Here's what's happening.
Step 1: Put the WRONG sides together.
The right sides of your fabric will be facing outward.
Sew a narrow seam.
Step 2: Trim the seam allowance.
Trim down those raw edges so they'll fit neatly inside the next seam.
Step 3: Turn the fabric so the RIGHT sides are together.
Now the first little seam you've made is tucked inside.
Sew another seam slightly wider than the first.
Step 4: Open it up.
The raw edges from that first seam are now completely enclosed inside the second seam.
No exposed raw edge.
No serger required.
And the inside of your project looks beautifully finished.
French seams are especially nice on lightweight woven fabrics and projects where the inside might be visible.
Four Questions to Ask Before You Sew
When you're working through a pattern, don't feel like you have to immediately sit down at the machine and start stitching.
Before you sew a seam, stop for a second and ask:
1. What piece am I working with?
Front? Back? Sleeve? Pocket?
2. Which direction should this piece sit on my fabric?
Check your grainline and any fold markings.
3. Which sides of the fabric should be facing each other?
Right sides together? Wrong sides together? Is there a special reason the pattern wants something different?
4. What happens to these raw edges when I'm finished?
Will they be hidden inside the project? Do they need to be finished? Is the pattern going to enclose them in another step?
Those four questions will prevent a surprising number of sewing mishaps. And they force you to think about what you're building rather than simply following directions and hoping for the best.
You Don't Need to Memorize Sewing
This is probably the biggest thing I want you to take away from this. You do not need to memorize every pattern symbol, seam finish, fabric term and sewing-machine setting before you're "ready" to sew.
That's not how you become confident. Confidence comes from understanding what's happening. A grainline helps control how your fabric behaves.
Notches help your pieces line up. Seam allowance affects the size and shape of your finished project.
Right sides together puts the seam allowance inside. Seam finishes control the raw edges.
Once you understand the job each step is doing, sewing patterns stop looking quite so mysterious. And when you encounter something you don't understand?
Don't start changing everything.
Don't assume you're bad at sewing.
Stop.
Look at what the pattern is telling you. Figure out what that step is supposed to accomplish. Then make your next move.
Because around here: We don't guess. We debug.
Still getting to know your sewing machine?
If sewing-machine problems are the part that keeps stopping you, grab my free Sew What Debug Guide.
It'll help you slow down, look at what's actually happening and troubleshoot your machine without randomly changing five settings and hoping one of them works.
